In this article, I’ll talk about the various services and tools that I tried to stream my presentations. I’m going to talk about OBS Studio, why and how I use it. I will also review a bunch of video conferencing and streaming platforms like Jitsi, Twitch, YouTube, Zoom.
This section should be relevant regardless of your operating system(i.e. applicable to Linux, Mac, or Windows), while part 4 will dive into everything specific to Linux. For context, please check part 1!
OBS Studio
When I started to look at what people where using to stream (whether it’s games, educational content, whatever), I saw OBS Studio coming up a lot. OBS stands for Open Broadcaster Software, and that’s exactly what it is.
I imagine that when you make a live TV show, you have possibly multiple cameras, mics, and a kind of mixer that lets you pick which camera you want to show at a given time; perhaps show multiple things at the same time (“picture-in-picture”), or add banners, titles, effects, and so on. OBS does exactly that, entirely in software.
You can arrange multiple “sources” (cameras, images, pre-recorded videos, text…) into “scenes”. Then you can switch between scenes just by pushing a button. If that sounds confusing, you can check the video of my talk, Troubleshooting Troublesome Pods, for an example. (Keep in mind that this was one of my first talks using OBS, and I was still getting used to it, working on the transitions, streaming quality, etc.)
Why OBS
So, why would someone want to use something like that, instead of just sharing their webcam and screen?
I’m going to give you a very personal answer. You’re welcome to disagree (strongly) with it.
It’s very difficult to keep an audience engaged, especially through a video. That’s why TED Talks are only 18 minutes, and that duration isn’t random, it was determined by science. My technical workshops and training courses are way, way longer than that. Over the years, I learned (consciously or not) a lot of techniques to be as engaging as possible and keep my students interested. Many of these techniques do not work for video content. For instance, walking on the stage, pointing things (physically, with my arms and hands) on the screen. Projecting my voice to different parts of the room. The overall body language.
I want my training sessions to be successful, and that means keeping people interested. And it’s not just their responsibility, but also mine. Some folks can keep their attention to a screen share. I can do it maybe 10 minutes, but certainly not for hours. This means deploying many new tricks and techniques. Dynamic video content is one of them. It’s obviously not the only one; and it doesn’t work the same way for everyone.
In my case, that means that I want to be able to switch between multiple cameras: one showing the upper half of my body (I present standing), typically when addressing the audience and showing slides; and the other one showing just my head, when running demos. So I need a way to efficiently put these things together and switch between views. That’s OBS.
OBS workflow overview
OBS works on Linux, Mac, and Windows, and the interface is virtually the same on all three platforms. You can use it with your webcam (or webcams, if you have multiple ones), mics. You can share your screen (or individual windows) with it. It supports live video effects (like chroma key or “green screen”).
When using OBS, you define one or multiple “scenes” (I will tell you the ones I use a bit later) and then you can output your video+audio feed in two ways:
- by sending it over RTMP, a protocol very popular with virtually all streaming services including Twitch, Youtube, etc.;
- by recording it to a local file.
As you can see, this doesn’t include familiar stuff like Skype, Zoom, etc., but there are ways to make it work, including:
- showing the OBS preview (your live video) on a screen and sharing that screen,
- using a virtual webcam plugin for OBS.
The first option works great if you have an extra monitor (it could be a virtual one if you know how to set that up), but will typically use a lot of CPU resources and may not always give you the best results (more on that later).
The second option should make OBS work with any system that can use any webcam. The “virtual webcam” setup will depend on your platforms (it works differently on Linux, Mac, Windows).
My OBS scenes
I continuously tweak and iterate on this, but at the moment, I am using:
- pre-roll,
- slides with camera,
- slides witout camera,
- fullscreen with camera,
- fullscreen without camera,
- break.
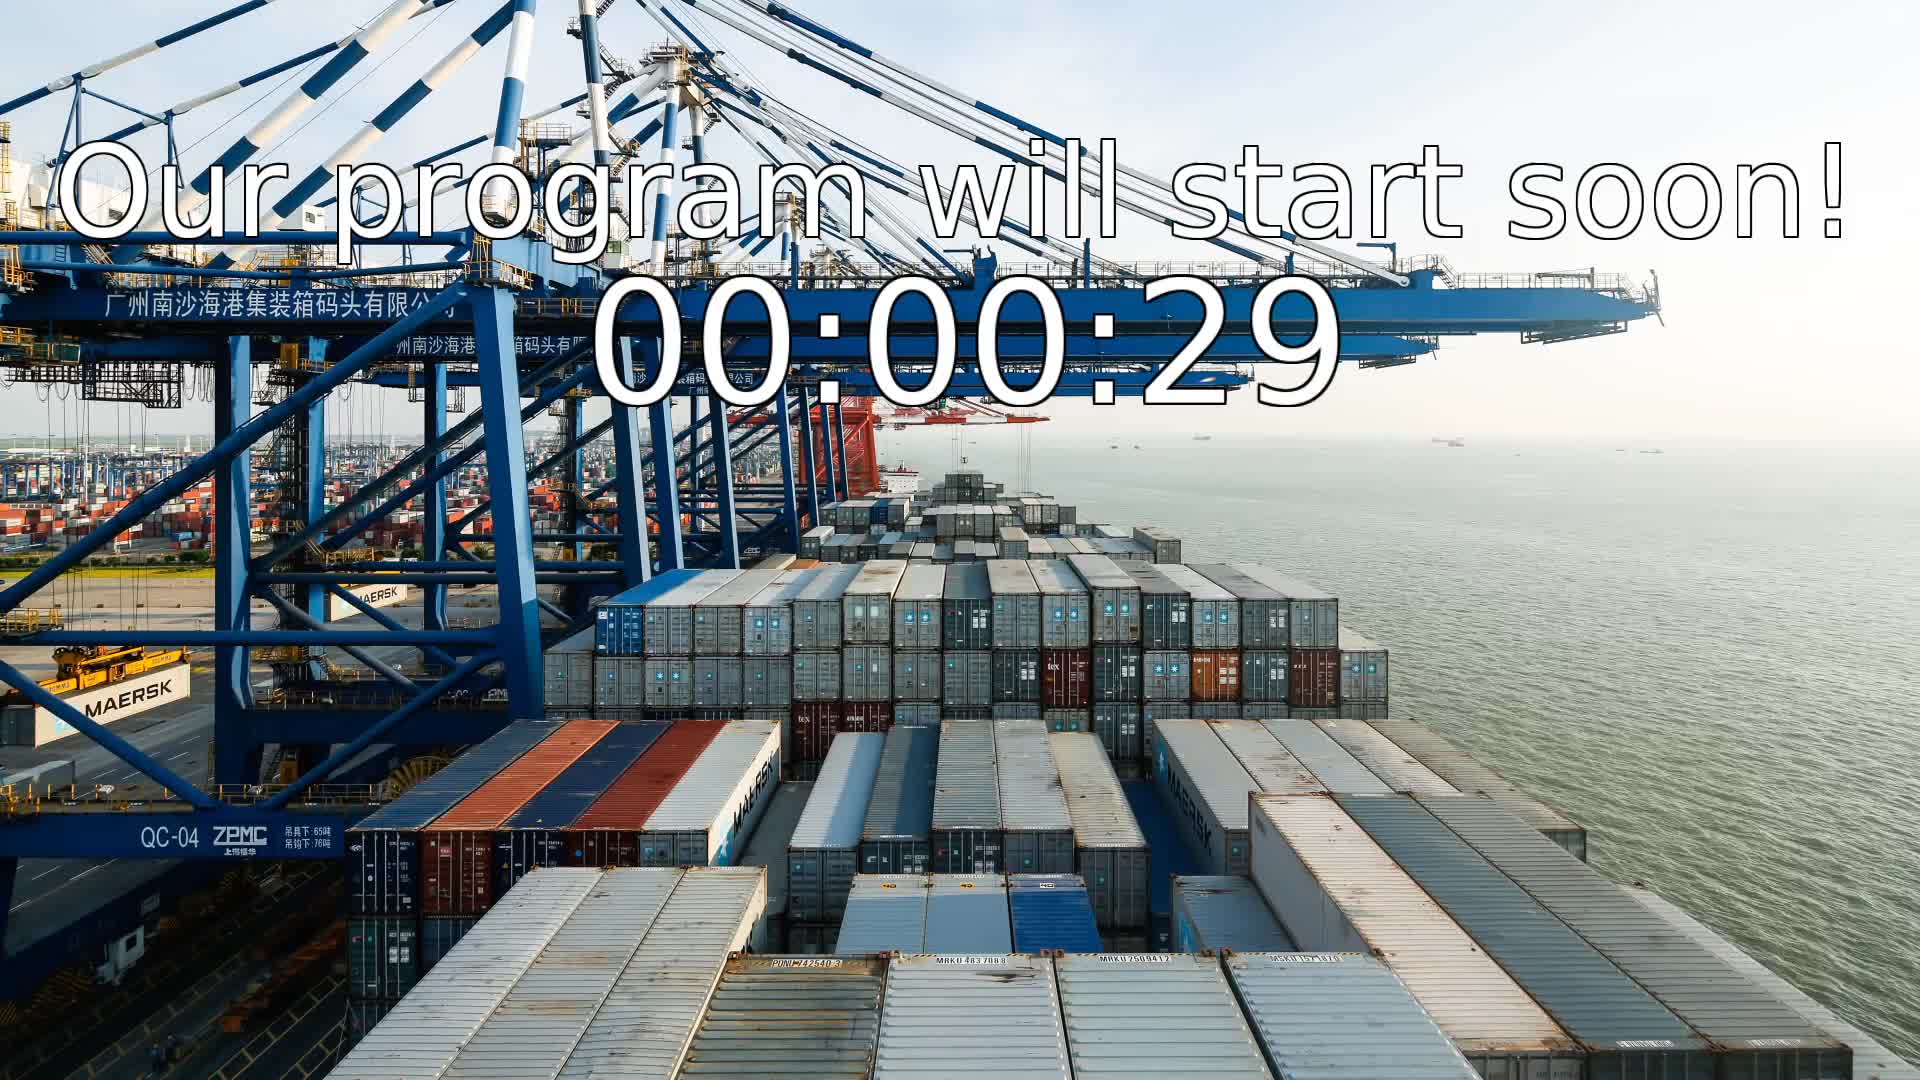
Pre-roll and break show a video in a loop, with a big countdown indicating when we will start (for the pre-roll) or when we will resume (for the break).
This is now the “slides with camera” scene:
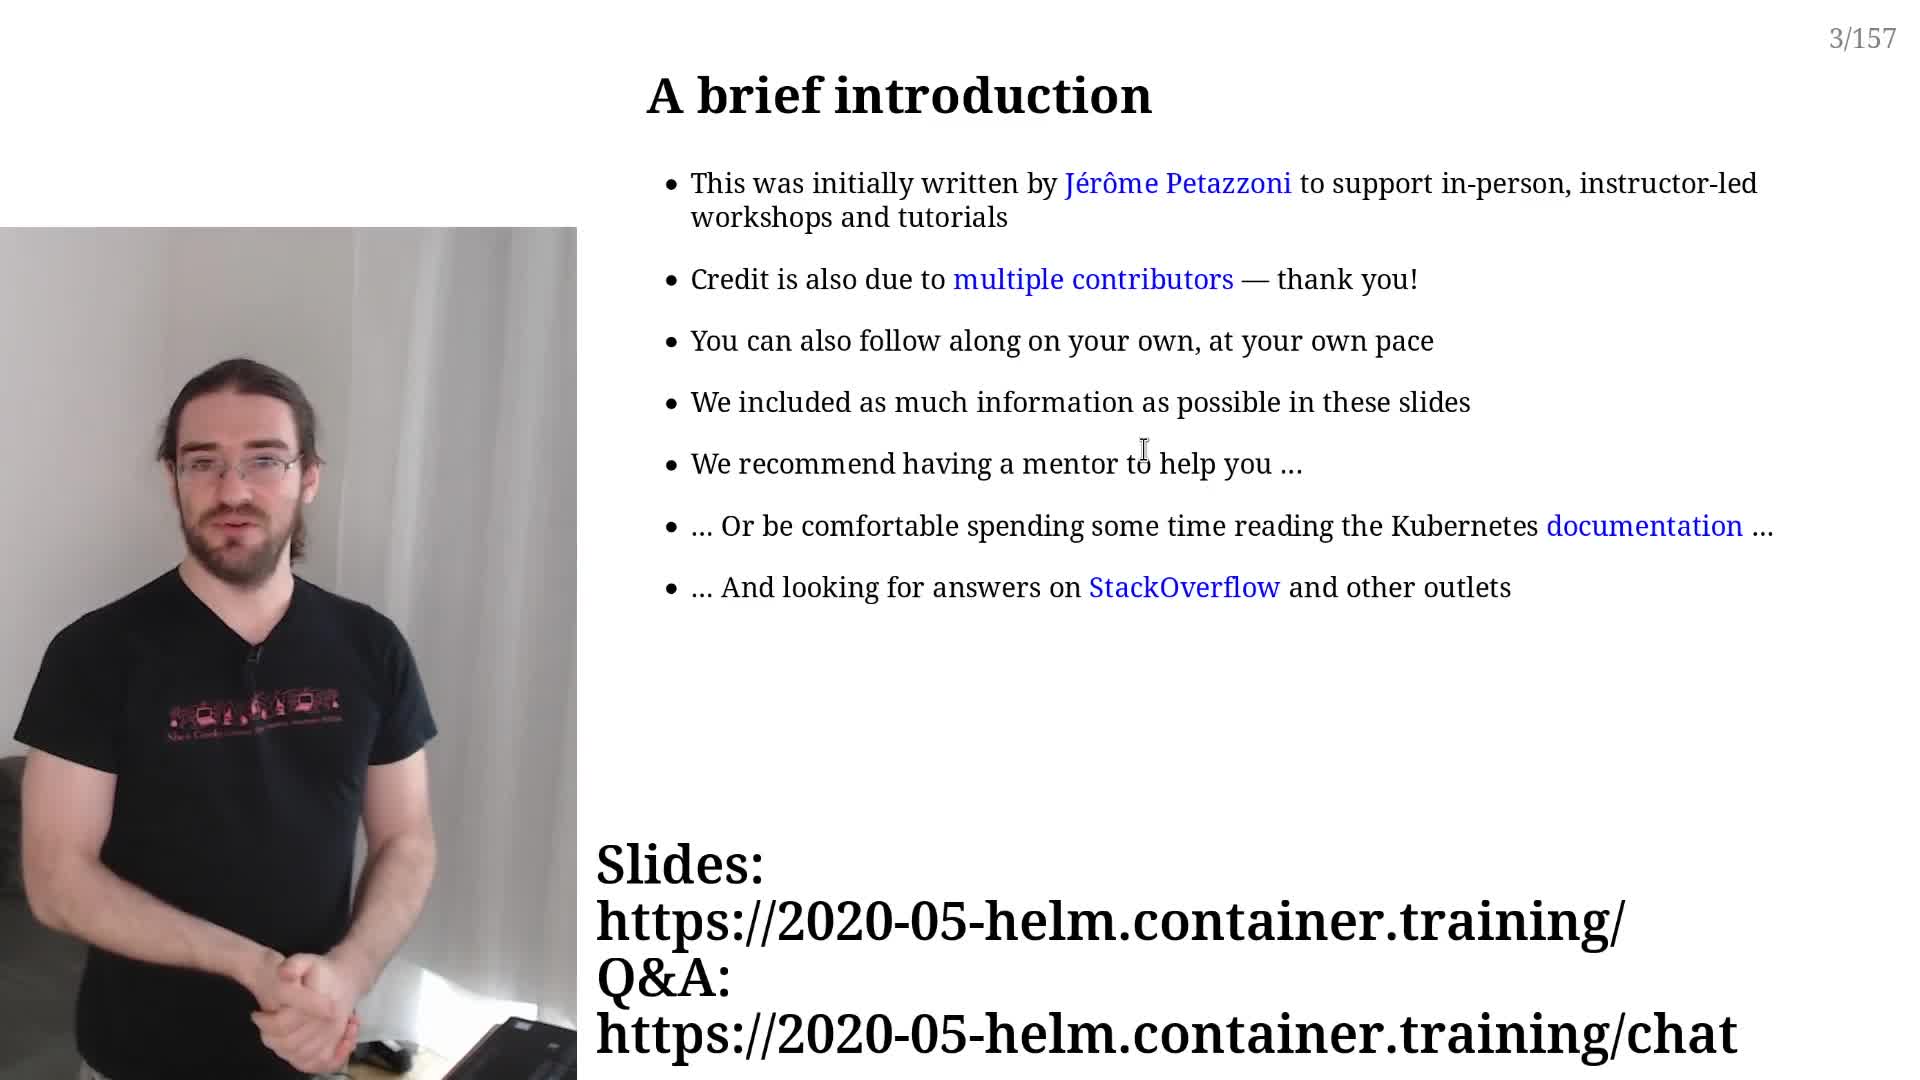
I use that one when I don’t necessarily need to full resolution of the screen, and I want my body language to be visible. This is great for slides and diagrams, for instance. (My slides use very big text, so it’s generally not an issue if they only take a part of the screen.)
As you can see, that scene also shows important links. This is useful, because when people join, they connect to the video stream, but they don’t always have access to the other links (slides, chat room, etc.) so I found that it was helpful to have these links on screen regularly.
I have a similar scene without the camera, which I rarely use.
This is now the “fullscreen with camera” scene:
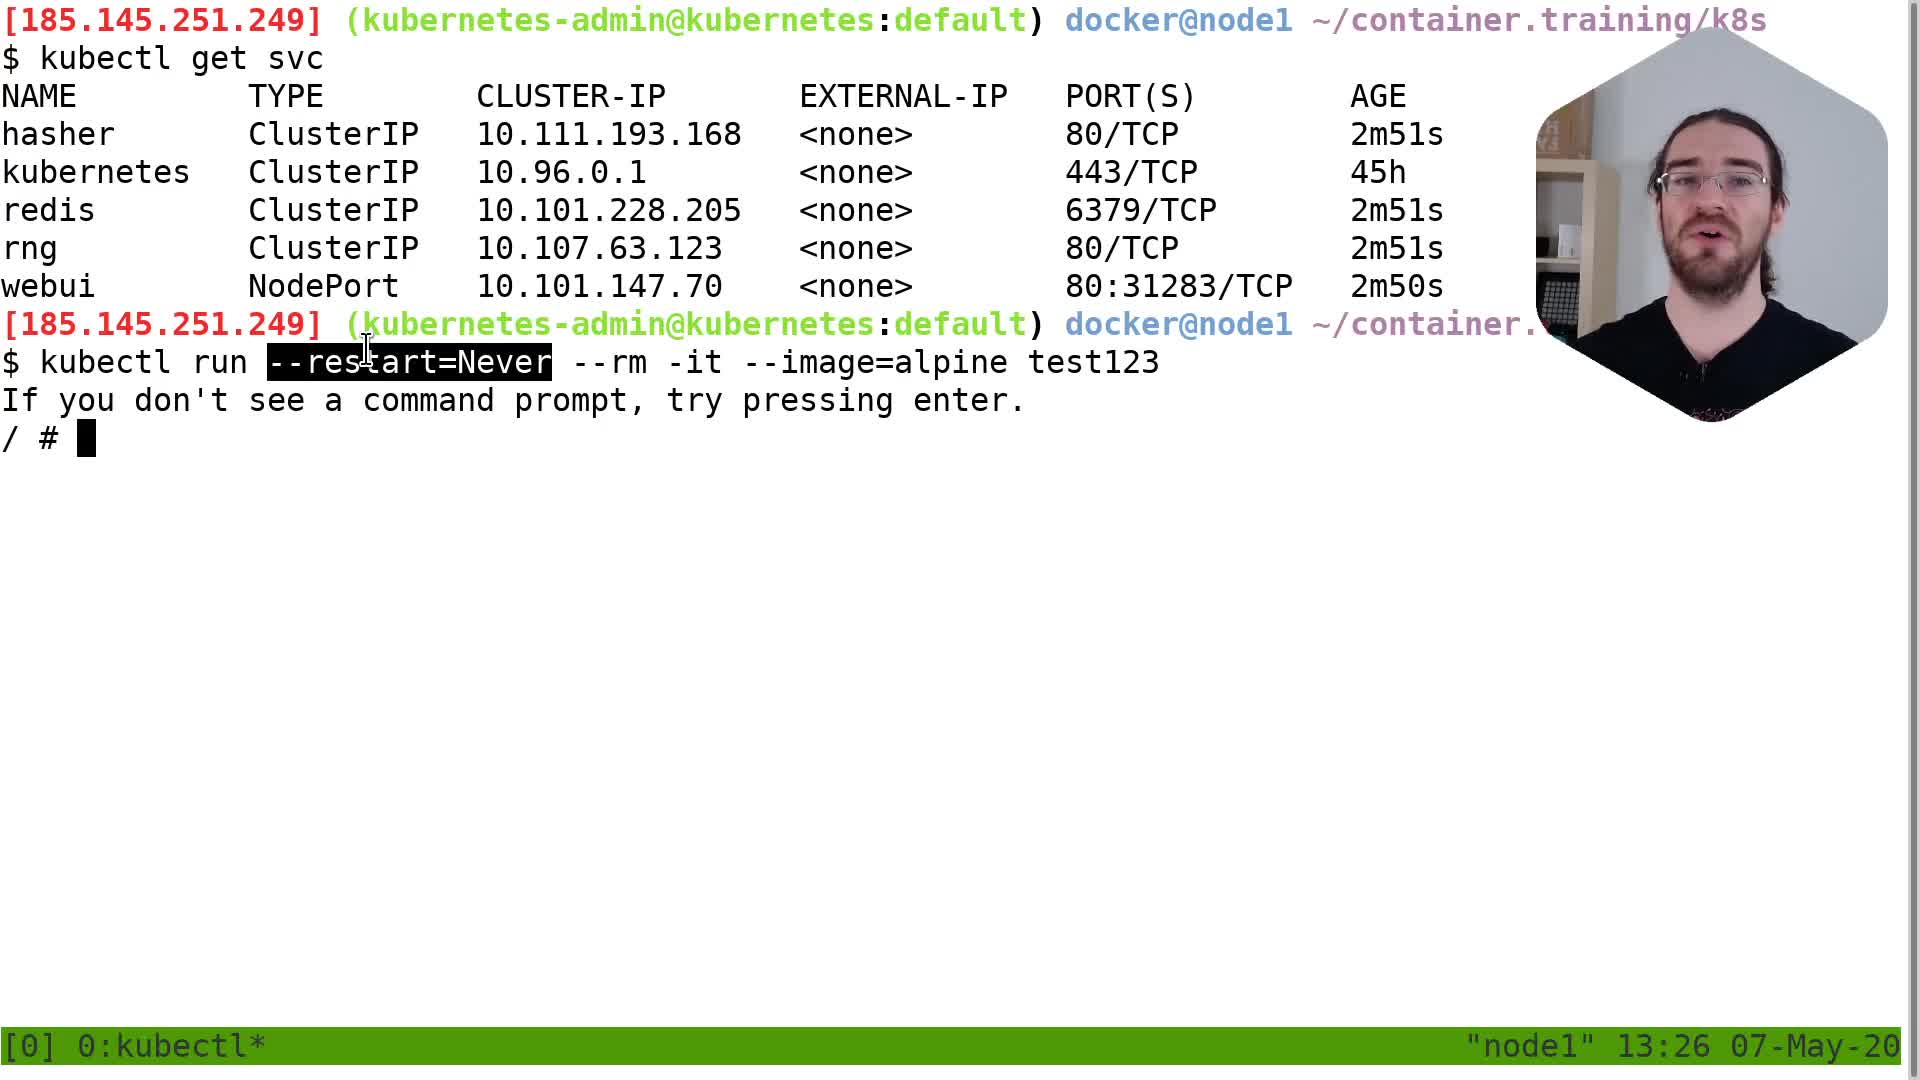
This is great when showing a text mode terminal, web browser, or anything where I need the full resolution of my screen and the full “real estate” of the stream; but I keep my head in a corner. And there is the same scene, without my head - because sometimes there is something important in that part of the screen.
I’m using a “mask” effect on that camera (the hexagon shape on the example above). It’s a tiny little detail, but it’s more pleasant to the eye, and when I show my slides using that scene, the slide number is in the top right corner. The mask lets the slide number show up .
Green screens
You might wonder why I’m not using a green screen. I do have a green screen, but as soon as you try to use multiple angles, it gets tricky to have the green screen as a consistent backdrop against all possible angles.
I personally think that it’s better to have multiple angles, rather than the transparent background effect that the green screen offers
Countdowns
OBS lets you show text either as a “constant” (you define the text once for all) or by pulling it from a file. In that case, it will periodically re-read that file and update the text. I have a Python script that runs in a loop and continuously updates a text file with the countdown, and then I set OBS to show that text file in the countdown scenes.
Switching scenes
You can switch scenes by clicking in the OBS interface, or with keyboard shortcuts. I am using a Stream Deck that sits next to my sceen, and gives me buttons for each scene. The Stream Deck also has button to “start a five minutes break” as well as adding/subtracting one minute from the break time (so that I can adjust the break duration in a pinch).
Studio mode
OBS also has a “studio mode” that lets you show a scene while you edit another one. This is great to prepare a “next shot” backstage, and then activate it. This sounds amazing to achieve something even more dynamic, but I imagine that it requires at least two persons: one in front of the camera, another one behind (or rather, in front of the OBS interface, with their attention fully dedicated to it). I haven’t used it yet.
Quirks
I’m pretty happy about OBS, but there are also some downsides.
I’m going to list some of them here. That way, if one of them is a dealbreaker for you, you will know!
Out of the box, OBS can only stream over RTMP. As said above, most streaming sites support that, so that’s great; but if you want to use it for your video calls, you will have to install an extra plugin or do some hacks, as mentioned above.
It can’t stream to multiple destinations at the same time. Sometimes, this would be very convenient. Again, there are hacks to do that anyway if you need to.
The text features are “OK but not great”. If you are streaming in HD, you will want to use a ridiculously high font size, otherwise the text will show pixels. Since most fonts are vector-based these days, it would be great if it could handle that better. It would also be amazing to be able to change the color of the shadow, or put a backdrop, behind text.
When you get disconnected from the server to which you’re streaming, sometimes it will gracefully recover, but sometimes it will also remain stuck and you will have to quit and restart it.
It doesn’t refer to sources in a consistent way. On Linux, for
instance, it will refer to webcams using their device nodes
(something like /dev/video0, /dev/video4, etc.) and when you
connect / disconnect cameras, these numbers can change. The cameras
are then all messed up in OBS and you need to reassign them. It’s not
a huge deal but I find it mildly annoying with just 2 cameras (3 if
we count the internal webcam of the laptop, which I’m not using), so
I imagine that it could get really obnoxious with lots of cameras.
I’ve seen similar complaints from folks using it on a Mac, when their
device names change for some reason, they have to re-add them to OBS.
Not really a quirk, but: keep in mind that OBS (and the associated protocols and services) is more complex than just firing up Zoom and go. The results can be amazing, but you should be prepared to spend some time figuring it out. See for yourself if you think it’s worth the investment. In particular, if your goal is high quality (like 30 fps, full HD video), you will need some good hardware for encoding, and perhaps learn about video codecs and tuning. This is a whole other can of worms.
Broadcasting our content
Now that we’ve talked about OBS, let’s talk about how we get that precious video and audio content to our viewers.
Video calls vs streaming
First, let’s start with some general considerations.
From both a practical and technical standpoint, there are two kinds of systems: video calls, and streaming.
Video calls are real time (or almost real time, with typically less than half a second of delay, which is imperceptible, except in some specific scenarios, for instance if you try to perform live music with other people). There can be multiple participants sending audio or video at the same time, meaning that it’s possible to interact directly with the presenter. Most platforms accommodate dozens of viewers, some of them can even do hundreds.
Streaming is generally one person (or a very small group) sending to a larger audience. Since audio and video flows in one direction only, interaction requires a separate channel, like a live text chat or separate Q&A app. Most streaming platforms can accommodate thousands of viewers, and some of them will scale to millions of viewers. This is achieved by using very different protocols and techniques, which come with a higher latency. The “glass to glass delay” (the delay between the moment when you say or show something, and the moment when your audience hears or sees it) will be a few seconds in the best case scenario, but typically at least 20-30 seconds. The delay is acceptable to address questions as they come, but makes it harder to do quick “show of hands”, or generally speaking, to ask a question to the audience and immediately react to it. Finally, streaming tends to offer better quality, because the longer delay allows to use more efficient encoding and distribution mechanisms, in particular for viewers with slower connections.
Insinctively, a video call is great for a smaller, trusted audience. It allows to re-create the level of interaction that you could expect from a traditional in-person meet-up, or a mature classroom.
Streaming is great for a larger audience. It’s also less prone to trolling, heckling, or Zoombombing, since the audience cannot speak or show themselves. (They can still troll or harass through the Q&A or chat platform when there is one, though.) It re-creates something more similar to a large college amphitheater or conference talk.
If you’re wondering about technical differences: video calls transmit data directly, or with very little intermediaries. They can use a whole range of protocols, including proprietary and custom ones. On the other hand, streaming is generally done within a web browser, and will often use protocols like HLS or DASH, which break down the content into very short segments (a few seconds each) that are then played back to back by the client. These short segments are normal static files that can be distributed efficiently by a CDN. The whole process introduces the delay mentioned above, since content now needs to be transcoded, sliced, pushed to a CDN, buffered on the receiving side. The codecs used are also different, or tuned differently. Some codecs like the popular H264 can yield higher quality when they can “look ahead” at incoming frames, but that introduces extra latency. (I’m simplifying a lot of things here, but I hope this helps to understand why there is such a dramatic difference between the two approaches.)
My specific requirements
I’m going to give you a list of platforms and services that I tried. Again, this list is by no means exhaustive, and keep in mind that my needs are certainly very different from yours, so our final choices will certainly differ.
For reference, here is the use-case that I’m optimizing for.
- I’m delivering tech training that spans multiple hours, with an audience of 10-100 people.
- I want people to be able to see my face so that things remain as engaging as possible.
- I don’t need my face to be in super high resolution.
- I also want to be able to show my screen, with slides, text terminals, web browser.
- These things, however, need to be as clean as possible. I am used to zoom text when needed (since I usually present on a video projector) but blurry text with compression artefacts can be tiresome to read.
- I want latency to remain small so that I can easily interact with the audience, ask them questions, react to their answers.
- I also want to record what I’m doing so that the audience can get a high quality replay.
I do not need to stream to hundreds, or thousands, of people.
I do not need to bring another speaker on the virtual stage (at least not at this point).
YouTube
I haven’t used it directly myself, but I’ve been on multiple shows, live podcasts, etc., that were streamed to YouTube.
I found the latency to be very high and ruled it out for my work. I’m aware that there are settings to supposedly reduce the latency, but I haven’t tried them. I couldn’t find an official document telling what would be the typical latency to expect; just individual statements mentioning anything from 1.5s (which would be great!) to 15s (which would be less great).
Google also has the reputation to change how its products work over time, or even discontinue them, so I didn’t want to invest much time or effort into investigating that. (For instance, there seems to be a whole thing around a “new” vs “classic” interface, with lots of people asking how to do things that they used to be able to and can’t find how to do anymore. That didn’t bode well.) However, if you have a great experience with YouTube streaming, don’t hesitate to let me know!
Jitsi
Jitsi is an open source video conferencing system. You can deploy it on your own servers, and there is also a free option, Jitsi Meet.
During my workshops, I typically switch between three different windows:
- a web browser showing my slides,
- a terminal where I run demos,
- another web brwoser to show the result of these demos.
I thought that I could come up with something with Jitsi, where I would share these three windows + my webcam as 4 separate streams, allowing the viewers to pick what they wanted to see, and how they wanted to see it, at any given time.
Unfortunately, that didn’t turn out to be practical. Jitsi is fantastic if you want something that works “right here right now”, without having to install a program: it works in modern web browsers, using the WebRTC framework. However, sharing multiple windows turned out to be very CPU-intensive, and the quality wasn’t there. It was also inconvenient for the viewers. Overall, Jitsi is great for what it does (video calls) but not for my use-case.
I still plan on using it to provide live interaction with the students to promote a “classroom” kind of atmosphere.
Zoom
At this point, if you’re reading this article but haven’t heard about Zoom yet, I don’t know under which kind of rock you’ve been living :)
What you may or may not know is that Zoom has two products: Zoom Meetings and Zoom Webinars. Meetings are video calls (the one that you probably love or hate), Webinars look more like streaming: you’re the only one to present (optionally with co-hosts), there is a tiny bit extra latency (but barely), and the quality seems to be a bit more robust for the audience.
I discovered another difference between Meetings and Webinars. In Meetings, the audience can interact with you with “non verbal communication cues”. There are buttons to indicate “yes”, “no”, “faster”, “slower”, “I need a break”, that kind of thing. In Webinars, there is only a button to raise hand.
Zoom is great for live video calls. In my experience, it does really well on slow or unreliable network connections. It also makes it super easy to switch cameras and mics. The screen sharing has a really high quality (more on that later). On the down side, there has been stories in the news highlighting security concerns. I have opinions about that, but they are not relevant to the present conversation, so I will leave them aside. And more importantly, it has other issues that make it inferior for my use-case. I’ll talk about them now.
The Zoom chat
Zoom has an integrated chat. It’s convenient if you just need to paste some information to someone, like an URL or short command to type or error message. However, it lacks:
- proper formatting (not just bold and italics, but most importantly, the ability to have monospaced code blocks; or even better, syntax highlighting),
- an easy way to highlight someone,
- efficient scrolling when there are lots of messages,
- a better way to notice when a message is addressed to the whole audience vs just you.
You might think, “whoa, that guy seems picky about their chat room!” and you wouldn’t be wrong. But as it turns out, I regulary use Gitter when delivering workshops and training sessions, and it’s a completely different experience. It addresses all the shortcomings mentioned above, and when I polled training participants, they universally preferred Gitter. I will talk again about it later.
Zoom video codecs and tradeoffs
Zoom does something extremely smart with video codecs. When you share your webcam, it uses an average quality video encoding with low latency and a good frame rate. When you share your screen, it uses a very high quality video encoding, but with a much lower frame rate.
This is great for most people who want to share their screen (with slides, demos, whatever) and show their face as two separate streams. However, as mentioned above, I use OBS Studio to create a single video stream that alternates between my face, the slides, me next to the slides, etc.
There are at least two ways (that I’m aware of) to send my video to Zoom.
The first method is to use a virtual webcam. OBS sends my fancy video to the virtual webcam, and it shows up in Zoom (or in any other app for that matter). Unfortunately, this degrades the video quality: since Zoom “thinks” that I’m sharing a webcam, it’s using a lower quality video encoding. It’s not really visible when seeing someone’s face in a video call, but it becomes very apparent when sharing a terminal or browser.
The second method is to share a screen. The trick that I use is to get OBS to show the video output on a dedicated screen, then use Zoom’s “desktop sharing” on that specific screen. The quality is then crystal-clear, but the frame rate drops significantly, and it becomes very noticeable when I am visible on screen.
Zoom little details
When sharing a screen, the Zoom controls are always visible on that screen, and you may or may not be able to hide them. I couldn’t find a way to completely hide them, so what I do is that I move them off screen. (With a minor annoyance, though: my streaming setup has 3 screens, and for some reason, I cannot move the Zoom controls to the control screen, which is the only one hidden from the audience; so instead, I move them to the side, in way that they are 90% off screen, but they still partly show up.)
One last thing: when sharing your desktop with Zoom, it uses a rather smart privacy feature that will grey out its own windows. For instance, if someone sends you a message through Zoom, and that message shows up on the desktop that is shared with the audience, they won’t see it: they will see a greyed out window instead. I imagine that this is pretty ueful if someone sends you some private information (like a password) or some profanity, to prevent it from being seen by the audience.
Discord
It might surprise you to see Discord here. If you haven’t heard about Discord before, some people describe it as “Slack for gamers”. It has excellent audio and video sharing capabilities. I’ve seen and heard lots of people dismissing it on the grounds that it’s “for games”, but it looks promising. I haven’t had the opportunity to use it for a workshop or training yet, but I hope to try it at some point in the future.
In particular, I wish all the communities and groups out there that are systematically deploying Slack to provide chat communication would consider something like Discord. It seems to be using an order of magnitude less resources, and it doesn’t require you to create one separate account for each “team” (community, company, group…) that you want to join. But I digress!
Twitch
After watching some folks stream on Twitch, I was impressed by the video quality (and the fact that for the audience, it just works in a web browser), so I decided to try it out.
It is very straightforward to set up. Note that while the audience doesn’t need anything special, you need to send your video as a RTMP stream. In practice, that means using something like OBS Studio. (There are tons of other options, of course.)
And indeed, the quality was great. But!
There are a few downsides that you might want to consider.
First, there is no way to make a private stream on Twitch. You can
kind of work around this by creating a new user for each stream,
with a weird name like validcowgeneratorpotato, and rely on the
fact that nobody will find it; but … it’s far from perfect,
and while I don’t know if it breaks Twitch’s user agreements,
it’s probably not what they have in mind!
More importantly, Twitch will probably not transcode your stream. Transcoding is the action of decoding and re-encoding your stream, generally with different (lower) bitrates and resolutions.
This means that if you stream at e.g. 2500 kb/s, your viewers will all receive a 2500 kb/s stream. This is great if they do have that capacity, because it will guarantee that they get the best possible stream (or at least, the exact quality that you’re sending). But if someone has a slower connection, they’ll be out of luck and there isn’t anything that you can do about it.
Twitch will offer transcoding if you are a “partner”, and might offer it (depending on available capacity) if you are an “affiliate” or even a regular user. (You can find more details on Twitch’s affiliate program page.)
This makes Twitch suitable for public events (and for regular streaming), but not for private workshops or training sessions.
I wish their technology was available by paying them, though, because I found it awesome.
Other streaming services
I also tried a few other streaming services. Generally speaking, the quality was great, but the latency was too high for my needs. (I typically had 20-30 seconds of latency.)
These platforms are designed for massive streaming to audiences of thousands or even millions of viewers, so they’re optimizing along different angles, of course.
Here are some very brief notes on the ones I tried.
Dailymotion
Super easy to set up once your account gets approved. I really liked the straightforward, “no-nonsense” interface. There isn’t a lot of things to tune or tweak, but at least I didn’t waste hours trying to fit a square peg in a round hole.
Wowza Streaming Cloud
The setup is relatively easy. However, there are lots of moving parts. It looks like you can customize a lot of things, but when I tried to reduce latency, I quickly got myself in situations where I was wondering “is this going to work, or blow up to my face?”
AWS Elemental MediaLive and MediaPackage
The setup was relatively hard, even for someone familiar with both the AWS ecosystem and the general streaming/ecoding lingo. If you follow the docs and tutorials step by step, it’s easy to get something that works, but as soon as I tried to tweak things, I got myself in corners where it wouldn’t work and give me rather obscure error messages.
Ant Media Server
I ended up trying Ant Media Server, because it promised “ultra low latency, 4k, 60fps streaming for thousands of viewers”. To be clear, I don’t care about 4k and 60fps, but if it can do that, it can certainly do 1080p at 30fps, and the low latency feature got my attention. The low latency feature is only available for the enterprise edition, but the enterprise edition is available on the AWS and Azure marketplaces with hourly prices. Since I don’t need this on 24/7, I thought it could be a good idea.
I’m still in the process of validating my whole setup with Ant Media Server, but (after a lot of tinkering) I’ve seen some pretty good results. Expect an update (or even a complete follow-up article) about it in the future.
(At the moment, I’m happy with the low latency streaming, less so with the adaptive transcoding, but I’ve found ways to work around it by encoding multiple streams at the source. Anyway!)
Virtual classrooms and webinar platforms
There are many products out there. Some of them seem extremely promising, and for many people, are probably better solutions than what I’m building.
Unfortunately, I haven’t found any solution yet that would let me stream my own video composition, or have the countdowns that I use for breaks, for instance. Most of them also can’t do high quality recording.
I expect this space to evolve a lot these days, since a lot of activity is switching to be online during the pandemic, so let me know if you hear about a product that you think I should test!
Everything else
I talked a lot about the video content and how to send it to the audience, but there are other things that matter to me.
Important information should be easily available
I alluded to this earlier in the OBS section. When I deliver a training or a workshop, there are more resources than just the video feed. There are slides; a chat room; possibly other things. I think it’s important to make sure that the links to these resources are super easy to get.
When delivering in-person training, I would often have e.g. the WiFi password and the URL of the slides on a flipchart or whiteboard; that way, if someone shows up late, they can easily get that essential information and catch up.
Same idea here. We’re not likely to be caught in traffic or delayed by public transit before connecting to a remote classroom; but we could have an unexpected mandatory OS reboot, a kid or other family member that needs immediate assistance, a headset that we thought would be charged but the battery is now empty, etc., so some folks will still be late, and it’s not their fault, and we need to make it easier for them. So I try to make sure that people have at least the link to the stream (or some other landing page) and then I have all the relevant information in the stream.
Chat platforms
The chat rooms that come with Twitch, Zoom, and many other video conference or streaming platforms generally provide the bare minimum level of functionality.
I gave some details earlier about the limits of the Zoom chat and suggested to use Gitter instead.
You might wonder, “why not Slack?” - I think Slack is great for some scenarios; specifically the ones where people are expected to commit a significant amount of time to set it up and use it. But for a short event like a workshop, even a week-long training, I am not a huge fan of Slack. It requires setting up an account, getting a confirmation e-mail, and then you get all these features and channels. I prefer something lightweight like Gitter. Gitter can use SSO with GitHub, GitLab or Twitter (if you already have an account with these platforms, joining a Gitter chat room will be literally two clicks). It also uses significantly less resources.
Of course, you do you!
Q&A and polling
I want to keep exploring options here. For instance, I intend to soon test slido to see if it helps to do some quick “hand raising” kind of poll.
Conclusions
After doing my research, I decided to build my own “virtual classroom” by putting together various software bricks and services.
It’s a lot of moving parts (especially as you will see in part 4, where I describe the OBS and streaming setup), and sometimes that can be scary; you really don’t want everything to fall apart minutes before starting a course.
However, I really like the flexibility that this is giving me; the ability to pick the tools that fit my teaching style (and the nature of what I’m teaching).
I’d like to emphasize one last time that this is not “the” best way of doing things; it’s just how I do them right now, and it’s likely to change over time. But I hope that this (which started as a disorganized collection of notes for my future self) can be useful for you as well!
In part 4, I will describe how I got OBS (and associated paraphernalia) to run on Linux. In fact, I even got everything running in Docker containers, and I’ll also explain why.