Capacity planning with Kubernetes is a non-trivial challenge. How many nodes should we deploy? What should be their size? When should we add or remove nodes to accommodate variations in load? One solution is to not deploy nodes, and provision resources on-demand instead. Let’s see how to do that.
What we’re trying to solve
When we deploy a Kubernetes cluster, we need to provision
a given number of nodes to run our container workloads.
If we provision too many nodes, we’re wasting money, because
a lot of that capacity won’t be used. If we don’t provision
enough nodes, our workloads won’t run. (Our pods will remain
in Pending state until there is available capacity.)
We also need to pick the right size for our nodes. This is another opportunity to waste resources! If we provision smaller nodes, there could be some unused resources on each node. Imagine what happens if we deploy containers needing 10 GB of RAM, on nodes that have 16 GB of RAM: then we waste 6 GB of RAM per node! It would be much more efficient to use nodes with 32 GB of RAM. But, conversely, bigger nodes mean more unused resources when we’re not using all the capacity. Having nodes with 32 GB of RAM, but just a few small containers on them, isn’t a very good use of our cloud budget.
Finally, we need to pick the right type of node. This will sound obvious, but if our workloads are RAM-intensive or CPU-intensive, we need to pick nodes with more RAM or CPU respectively. Otherwise, we end up with more unused resources, and wasted money.
What about cluster auto scaling?
One approach is to automatically add nodes when we are at capacity. Doing this is easy. Doing it properly requires to be more careful. If the auto scaling logic lives in a pod on your cluster, what happens when that pod gets evicted, but cannot be rescheduled because the cluster is out of capacity?
There are solutions to that problem, for instance:
- using priorities or tolerations to make sure that this critical component can always run,
- using a mechanism provided by the cloud infrastructure (for example, on AWS, a Lambda that would poll some Kubernetes metric and adjust the size of an Auto Scaling Group) …
But as we can see, this can get tricky. In particular, it’s tricky to test for these failure modes.
And how do we scale down? When we have e.g. 10 nodes, each using less than 50% of their capacity, we should be able to pack everything on 5 nodes and cut our costs in half. But Kubernetes will not repack pods for us. There are tools out there to achive the opposite thing (i.e. rebalance pods after scaling up) but I’m not aware of tools to help us to scale down clusters. (If you know of such tools, let me know, I’ll be happy to reference them here!)
Conclusion: cluster auto scaling is great to accommodate more capacity; but less great to save resources.
Can we just not run nodes?
There are at least two promising services out there, which allow us to run containers directly, without running servers.
- AWS Fargate proposes to “run containers without managing servers or clusters”.
- Azure Container Instances proposes to “easily run containers on Azure without managing servers”.
(There are other similar services out there; if you think I should include your favorite one, let me know, I’ll be happy to add it to the list!)
How does this work?
These services will provision containers directly on some infrastructure managed by the cloud provider. We are billed for the resource usage of these containers, without paying for the overhead of the Kubernetes nodes.
This sounds great! With two caveats.
First, resource usage is more expensive. This is absolutely normal: we pay for the convenience of not running and maintaining our servers, and not wasting extra capacity. I did some back-of-the-envelope calculations, and found that Fargate would be significantly more expensive than EC2 if you do an apples-to-apples comparison (e.g., pick an EC2 instance size and match it to Fargate) but that Fargate would be cheaper if you try to run containers that are just a bit bigger than a given instance size (because then you have to pick a much bigger instance, and end up wasting money).
The second challenge is that Fargate is primarily designed to work with ECS. ECS is Amazon’s container service, and it is not Kubernetes.
Enter Virtual Kubelet.
Virtual Kubelet
Kubelet is the name of the Kubernetes agent that
runs on every node of our cluster. When a node boots up,
Kubelet is started. It connects to the Kubernetes API
server, and it says (more or less) “Hi there, my name
is node752. I have that many cores, that much RAM and
disk space. Do you per chance have any pod that I
should run?” and after that, it waits for the Kubernetes
API server for instructions. The Kubernetes API server
registers the node in etcd. From that point, the scheduler
knows about the node, and will be able to assign pods
to it. When a pod gets assigned to the node, the pod’s
manifest is pushed to the node, and the node runs it.
Later on, the Kubelet will keep updating the API server
with the node’s status.
Virtual Kubelet is a program that uses the same API as Kubelet. It connects to the API server, introduces itself, and announces that it can run pods. Except, when it is assigned a pod, instead of creating containers (with Docker, CRI-O, containerd, or what have you), Virtual Kubelet will defer that work to a provider like Fargate or ACI.
So Virtual Kubelet looks like a regular cluster node
(it shows up in the output of kubectl get nodes)
except that it doesn’t correspond to an actual node.
Anything scheduled on Virtual Kubelet will run on its
configured provider.
Virtual Kubelet is not ready for production (yet). The GitHub page says:
Please note this software is experimental and should not be used for anything resembling a production workload.
But it is under active development by many contributors and I wouldn’t be surprised if it reached a more mature status soon, at least for Azure workloads.
It turns out that there is another solution out there allowing to provision resources on the fly for our pods.
Kiyot
Kiyot is a product by Elotl Inc. which implements the CRI (the Container Runtime Interface). The CRI is the interface between Kubelet and our specific container engine. For instance, CRI-O and containerd implement the CRI.
Kiyot looks like a container engine, but when asked to run a container, it will provision a cloud instance and run the container in it. It also deals with pods, i.e. containers sharing the same network namespaces, volumes, etc.: it runs all the containers of a pod within the same cloud instance.
(Implementation detail: the heavy lifting is actually done by Milpa, another product from Elotl; Kiyot is the CRI shim between Kubelet and Milpa.)
I was given the opportunity to try the beta version of Milpa and Kiyot, so I did! And I found it remarkably easy to setup and operate. Of course, there are some scenarios when it doesn’t behave exactly like a normal Kubernetes node, but that’s expected (more on that later).
The installation was straightforward. You can run Kiyot as a standalone process in an existing cluster, but the beta came with an installer based on kops, and all I had to do was:
- set 3 environment variables (to provide my AWS credentials and indicate which region I wanted to use)
- run a provisioning script
- wait 5-10 minutes
… and at that point, I could run:
$ kubectl get nodes -o wide
NAME      STATUS  ROLES   AGE  VERSION  …  CONTAINER-RUNTIME
ip-172-…  Ready   master  5m   v1.10.7  …  docker://17.3.2
ip-172-…  Ready   node    1m   v1.10.7  …  kiyot://1.0.0
I see a node using the Kiyot container runtime. Whenever a pod is scheduled to that node, Kiyot will provision a virtual machine for it, and run the pod in the virtual machine.
I wanted to try to real-world workload on Kiyot. My main job these days is to deliver Kubernetes training. I have a bunch of labs and exercises that I use during my training sessions. I thought that running all these labs and exercises on my brand new Kiyot-powered cluster would be a good experiment. I was positively impressed by the results.
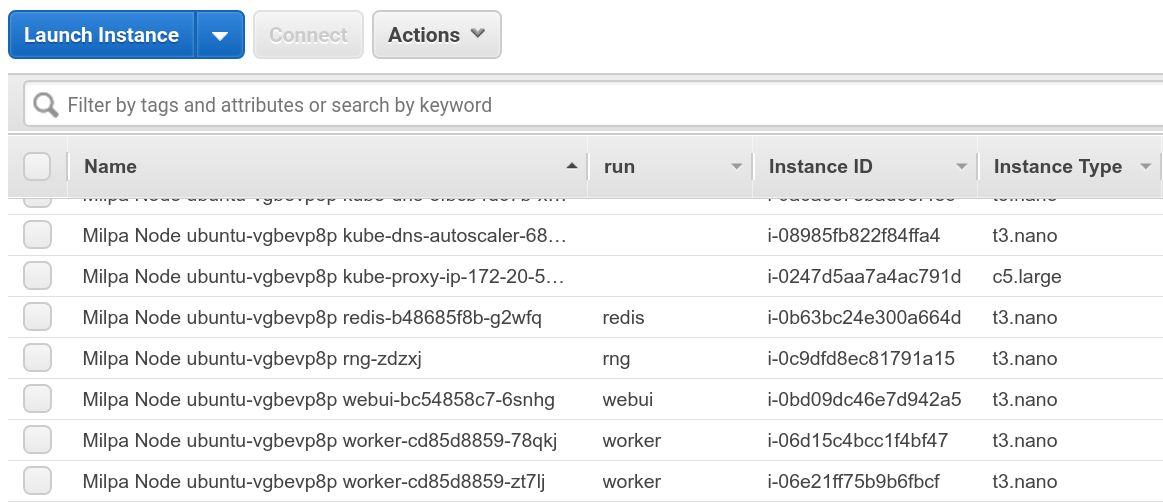
The screenshot above shows my AWS console after deploying one
of my demo apps on the cluster. Each t3.nano instance corresponds
to a pod on the cluster. My demo app is started with
multiple kubectl run commands. When we use kubectl run
to create resources on Kubernetes, they automatically get a
run label matching the resource name. So if we do
kubectl run redis --image=redis, we create a deployment
named redis, with a label run=redis, and all the resources
created by this deployment (specifically, pods and replica sets)
will also have this label run=redis. Kiyot propagates
these labels, materializing them as regular EC2 tags, which
we can then display in the console. Long story short: the run
column above shows the run label of our Kubernetes pods
(and we can show any Kubernetes label in the console).
Implementation details
Each Milpa “cell” (that’s the name for the VMs running pods) runs a very lightweight REST API. I do not have shell access to the cells, but I am guessing that the “cells” are running a very trimmed Linux distribution. (Perhaps Alpine, perhaps even just a barebones kernel + initrd.) In fact, since each pod runs in its own VM, the cells wouldn’t even need a full-blown container engine. This means that the overhead for each pod is very minimal. This is a pretty big deal, because on a “normal” Kubernetes node, there is a significant amount ot resources used by Kubelet (and other essential Kubernetes components). I know that it’s possible to use tiny machines (like Raspberry Pis) as Kubernetes nodes, but usually, I do not recommend to use machines with less than 4 GB of RAM as Kubernetes nodes. With the approach used by Milpa, tiny nodes (with 512 MB of RAM) work just fine.
Setting each pod in its own EC2 instance also simplifies the network setup a lot. Kubernetes networking can be complex, especially in cloud environments. We need overlay networks and/or a way to distribute routes and/or custom mechanisms (like the ENI plugin for AWS). With Milpa and Kiyot, the IP address of a pod is just the IP address of the underlying EC2 instance. We don’t need to map ports, encapsulate traffic, distribute routes, etc., everything is managed by the AWS network fabric, like for normal EC2 instances (since pods are normal EC2 instances).
The most noticeable difference is that it takes a bit longer to start a pod, since it involves provisioning an EC2 instance. In my experience, it took less than a minute for the pod to come up. That’s pretty good, since it includes instance provisioning, booting, pulling the image, and starting it.
Conclusions
Both Virtual Kubelet and Kiyot let us run Kubernetes workloads without provisioning Kubernetes nodes. Virtual Kubelet runs Kubernetes pods through a “container-as-a-service” provider, while Kiyot creates regular cloud instances for our pods.
In both cases, we pay for what we use, instead of provisioning extra capacity that we don’t use. Depending on your workloads, Kiyot can also be significantly cheaper, since it uses normal instances (instead of Fargate or ACI, which come at a premium).
In both cases, we benefit from additional security. (For instance, when using Kiyot, each pod runs in its own virtual machine.)
If you run large Kubernetes clusters (or, to put things differently: if your Kubernetes clusters incur non-trivial infrastructure bills!), I definitely recommend that you check Virtual Kubelet and/or contact Elotl to get a free trial of Milpa and Kiyot.
Update: there is now a Community Edition available for Milpa and Kiyot, suitable for smaller deployments.